Wednesday, January 31, 2018

Jute Heart Card by Tobi


Hello Tobi here.  Bold statements call for bold elements! Today I'm sharing a card made with a large Jute-twine heart that is so easy, I don't know why I haven't done it before! 


You will need:
Jute Twine
Matte Medium (I a local art store's generic brand)


1.  Wrap twine into a circle and tie the ends off. 
2.  Form a heart (or whatever shape... the twine is relatively stiff so it mostly kept it's shape
3.  paint on a generous amount of matte medium. 
4.  re-form the desired shape and allow to dry. (i used a couple of cups and a pincher tool to keep my twine from moving)
5.  once dry, pick away any glue-boogers! 


I adhered the heart to the card with white glue. 

I finished off the project with a big, bold sentiment from the Big Love Clear Stamp set. 

Thank you for stopping by today!

-post by Tobi Crawford
Tuesday, January 30, 2018

Be Mine, Be Mine! by Shantaie

Shantaie here with more Valentine goodness.  I'm a lover of all thing Valentines!

I find that my most used crafty items tend to rotate to the top of my desk and lately my collection of we've got your border stickers are the star of my favorites stack! For this card I have used the Valentines we've got your border as my sentiment and an accent along the length of my card to help tie the colors together. I love that I can use them in so many ways!


A really busy card can be pulled together quickly with a sentiment strip trimmed from one of the borders. Here I have blended inks, embossing, a die cut and sequins, a little sentiment is sweet perfection!


A double wrapped bow of bakers twine in blossom and stone softens the look and adds another pretty texture, I love having a textile element to touch on my cards! 

Anytime you have a need for just a little touch, reach for your border stickers for that perfect little saying, stitching or swirl of color!

Monday, January 29, 2018

Valentine's Banner by Angie


Hi friends! Angie here with you today to share a cute idea for Valentine's Day.


I made this  banner using just a few simple supplies.

I used the red heart doilies, white lace doilies and the scalloped punched pieces as the basis for my banner. I just layered them up and attached them together with a little glue. 


I used some chipboard letters from my stash to spell the word 'love.' I gave them a coat of black paint and added some black glitter on top of the wet paint. Once the letters were dry, I glued them in the center of the scalloped pieces.


On the two end pieces of the banner, I layered the doilies and scalloped pieces as before and then placed a heart sticker from the Valentine's themed stickers by the dozen set in the center. 


I strung the banner together using some black twine.
Give it a try!! This would make a fun project to do with your kids! 

Friday, January 26, 2018

Monochromatic Winter Layout by Giorgia


Hello SRM friends, Giorgia here.
This year I spent New Year's Eve and some other days on holidays in Budapest and I 
couldn't wait to scrap those pictures!


So I grabbed my SRM stickers winter themed products and created a monochromatic layout (please take a look to this other monochromatic layout too that I shared on my last post, if you missed it!).
Also this one is made in blue tones, because they remind me of winter!


I went with a vertical design: I added two strips of paper to a light blue cardstock and I simulated stitches with the awesome SRM Sticker Stitches.


I adhered some stickers to white cardstock and used them as embellishments. I used two paper clips to add them to the pictures.


I created a sort of journal under the chipboard title with some sticker. For the layout I used also SRM calendar stickers. I find them really useful to add dates to my LOs!


I hope you liked my layout and wish you a good day. 

Until next time,
ciao, Giorgia

SRM products used 

Thursday, January 25, 2018

Bible Margin Stamps Gift Bags by Karen


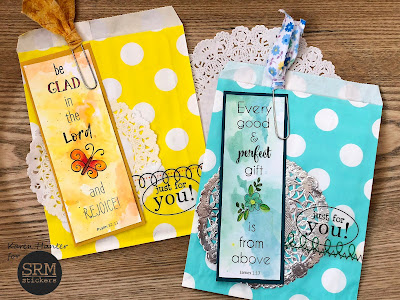
SRM's new Bible Margin stamps aren't just for Bible journaling. I used a couple of margin stamps as part of a gift bag decoration - and they double as bookmarks!


I stamped the margins on white cardstock which I had watercolored a pretty background. I used watercolor pencils to add more detail to the images. Mounting it onto a piece of colored cardstock helps it stand out against the fun patterned paper bags, doily, and sticker stitches and sentiments. 
By using a decorative clip to attach it to the bag, the recipient can easily remove it to use as a bookmark, too


For this project, I used:
Patterned bags | Bible Margins stamps RejoiceSticker Stitches | Sticker Sentiments Happy Birthday | ColorIn Watercolor Pencils

Wednesday, January 24, 2018

Love You Valentine Cards by Shelly


Hey y'all! Shelly, here.
Today, I'm swinging in to share couple simple 'love you' Valentine cards with you! 


Hello!  Shelly here today to share some love! 
I started with my base card, which I centered my arrow in the the middle in my card. Then stamped it with a light grey ink. After I added my 'you' on top of my arrow using black ink. Next, I added 'love' slightly overlapping my 'you' using a red ink. 


To finish things off, I added a touch of black twine and thought it would be sweet to slip them each into a patterned bag. Simple, yeah?!...

Thanks so much for stopping by!
Enjoy your day!

SRM Stickers products:

BIG Congrats stamp set (for the 'YOU')
Walk by Faith stamp set (for the 'arrow' and 'love')

Tuesday, January 23, 2018

Heart Strings Jute Twine by Shantaie


Shantaie here today bringing you some Valentine love! 


There are string art projects everywhere lately, and can be purchased in almost every shape even green dinosaurs! I was intrigued, and wondered if I could make one myself. I picked up a wood frame by Jillibean soup, and cut a vinyl heart and placed it in the center, I found this step easier for me, as I can't really draw! I grabbed a handful of small nails and hammered them along the heart and peeled the vinyl away.

I began just wrapping and crisscrossing my jute twine in a random way, I didn't follow any specific pattern because I wanted my heart to be a free form pathway, kind of like my real heart! 


Not only was this fun, it was easy, and very relaxing. I would highly recommend this as a calming, or soothing activity, and the end result is so unique, and personal! If you want to make a specific pattern, there are plenty of instructions online, and you cam make almost any shape, especially using adhesive vinyl as a guide!

Monday, January 22, 2018

Bible Margins Bookmarks by Christine


Who's loving the new Bible Journaling releases?  I am!!!  Christine joining you today with some bookmarks using the Bible Margins Stamp sets. For these I worked with the Bible Margins Light and Bible Margins Rejoice Set.  These were quick to make and a really enjoyable way to get creative over the recent holidays!


For each of the bookmarks I combined Distress Oxide inks with stencils and created a unique background.  This was new for me and was a really fun way to explore this technique.  I then stamped the margins stamps in black.  This one features the Bible Margins Rejoice Set.


In addition to the black stamping I used my Black Le Pen to color in some parts.  It really stands out on this red one!  I also incorporated Bakers Twine in making my tassels.  This one features the Bible Margins Light stamp set.


I laminated the front of these bookmarks so that they would hold up a little longer.


This one I used a little different approach and used some wet mixed media to create the background - although I love the end result, I was having fun with stencils and decided to stick with that for the rest.  

SaveSave

Friday, January 19, 2018

A Little Valentine Treat by Giorgia


Hello SRM friends, Giorgia here today with you to share an idea for quick Valentines gifts.One of my favorite SRM products are the clear boxes, especially the pillow boxes: they are cute and perfect to embellish with SRM clear stickers!


I gathered my Valentines themed stickers (I also used the heart from Princess sticker sheet) and I applied them on the pillow box.


Then I filled it with some chocolates, and in just few minutes I had a cute little gift for my husband to brighten up his day.

Thanks so much for stopping by, enjoy your day!
Until next time,
ciao, Giorgia

Thursday, January 18, 2018

Love Story Coordinates Vinyl Sign by Samantha


Hello! Samantha here today with a vinyl Valentine's Day project. I thought I'd keep it really clean and simple, so I made a love story coordinates sign. 


To create this you'll need some wood (my sign measures 6" x 24"), paint (I used gray and a bit of white around the edges), SRM vinyl (I used matte white for the numbers and metallic red for the hearts), and a way to cut your vinyl (I used a Silhouette Cameo).


 My husband and I met in a city far from where we live now, so I thought it would be fun to use the coordinates to that city since that's where it all began. I'm not a terribly mushy person, so I kept it simple by swapping out the decimals for red hearts. If you're a little more lovey dovey than I am, you could also add the words "Where our love story started" or "Our love story began here" to your sign. 


 This love story coordinates sign is a fun way to remember the distance your love has traveled. Where did your love story begin?

Wednesday, January 17, 2018

Mustache You to be my Valentine by Shantaie


Hello!  Shantaie joining you today with some Valentine treats! 
I know it's cliche' to say "I love Valentines day" but it's one of my favorite celebrations!  My girls are far beyond classmate Valentines, so I like to make little gifts for my staff to hand out as a sweet little reminder that I appreciate them.


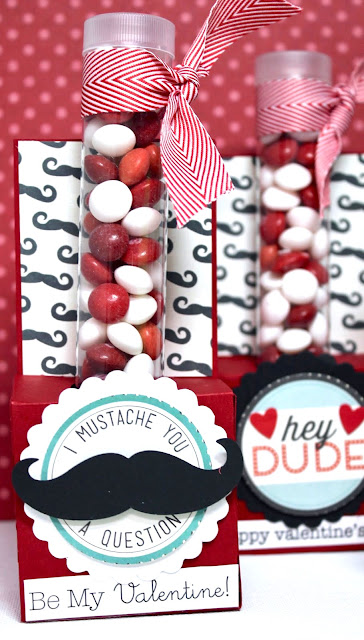
Most of my team are college students, so I can really have fun with the style of Valentines. I think these could work for almost anyone! My focus was on a little treat using the tubes to fill with candy. For the holder I used this cut from silhouette enlarged to fill the 12x12 cutting mat. I used the base only, and added patterned paper and round prints to embellish. 


I layered onto white punched pieces with foam tape, I also added hearts from the stickers by the dozen Valentine onto white cardstock and placed in the center of the printed circles. Tp top that off I added a bit of we've got your border sentiment to a skinny strip and adhered it in the center of the heart


For the mustache version I used the sentiment from that same stickers by the dozen valentine.  I used for the hearts on the sweetheart version. To add a bit of fun a die cut mustache is popped with foam tape and would be cute with a spring wobbler too! 


I love using tubes to make favors, give treats and even to store my crafty supplies! I have used them for years and each time I give one as a gift I am always thrilled at the excited reaction to them. 


Seeing someone smile is (to me) the best part of giving a Valentine! 
XOXO 

Tuesday, January 16, 2018

Bible Margins Cards by Christine


The new Bible Margins stamps don't have to just be used in your Bible!  There's a huge variety of crafts you can do with these beautiful stamps! Christine joining you today to share a simple set of cards featuring the Bible Margins Stamp Sets.


I used for this set of 3, one stamp from each of the new Bible Margins Stamp Sets.


This is the Bible Margins Rejoice Set.  I simply stamped this with a Distress Oxide Ink and then used a sponge to go over the butterfly with the same ink.  I added some pretty patterned paper from Paper House Productions to each card.


This one features the Bible Margins Light Stamp Set.  I love the different icons included in this set to represent light!


Finally I used the Bible Margins Love set!  This is a beautiful set featuring verses that are great for a variety of occasions...but most definitely will work for those Valentines as well!  

As you can see, these are not at all complicated cards but still turned out beautifully!  I love that these stamps just need a little bit of ink and paper to make them into a real treat!

Monday, January 15, 2018

Valentine Treat Bags by Shelly


Hey y'all! Shelly, here.
Today I'm stopping in to share some fun and simple Valentine treat bags with you! 


I started with using some small kraft bags and filled them with a little bit of goodies. To close them up, I added a couple tags. Which I simply added a 'Be My Valentine' sticker to white cardstock and made a banner out of it. To add a little bit of 'pop' I hand drew on some little 'dashes/stitches' using a pink pen. For my smaller tag, I added a fun background of arrows using the Bible Background stamp set in a light mint color ink. Then, I used the Walk by Faith stamp set for my heart and after did a little fussy cutting, then added it to my tag. 


To finish everything off, I made a little bow using some twine and then a mini staple to hold everything together. Easy peasy, right?!...

Thanks so much for stopping by!
Enjoy your day!

SRM Stickers products:

Small Patterned Bags

Friday, January 12, 2018

New Product Introduction: Glitter Heat Transfer


As SRM expands our Vinyl offerings we keep adding new styles and new colors.  
One of the most popular types of vinyl is Heat Transfer and today I want to share with you some of the new and beautiful colors of Glitter Heat Transfer. 

Annette Allen is making a guest appearance today sharing a peek at a "Glitter" T-Shirt that will be featured in the SRM Booth at the Creativation show in Phoenix coming up.  Actually, I will be wearing it in the booth! :)  Annette loves playing with vinyl and this T-Shirt uses a combination of red and gold glitter, silver matte and sequins.  YUM!


SRM carries two different brands of Heat Transfer:  Siser and Chemica.   Both of these brands are the highest quality vinyls with so many amazing colors.  Here are the 2 latest colors of Siser's Glitter Heat Transfer:  Mermaid (I love that name!) and Lemon Sugar Glitter.  


And here's a look at Chemica's yummy Glitter Heat Transfer colors.   I especially love the "bling" styles that look like glitter on a white background.


Thanks for joining us this week to see all the new goodies!  
We are off to the show and can't wait to see all of our old friends and to meet some new friends too!