Monday, July 31, 2017

Patterned bags by Giorgia Rossini


Hello!  Susan here to let you know that this is the week that our new design team begins it's term.  And today is also my birthday and I though what better way to celebrate it than with beautiful patterned bags from new design team member Giorgia Rossini.  She has a soft and dreamy style and she is loving her SRM.  So let's get started introducing you to Giorgia and her beautiful work.  To learn more about Georgia check out a short bio at the end of this post. 
--------------


Hello SRM friends, Giorgia here with my first DT project and I am so happy to be with you!

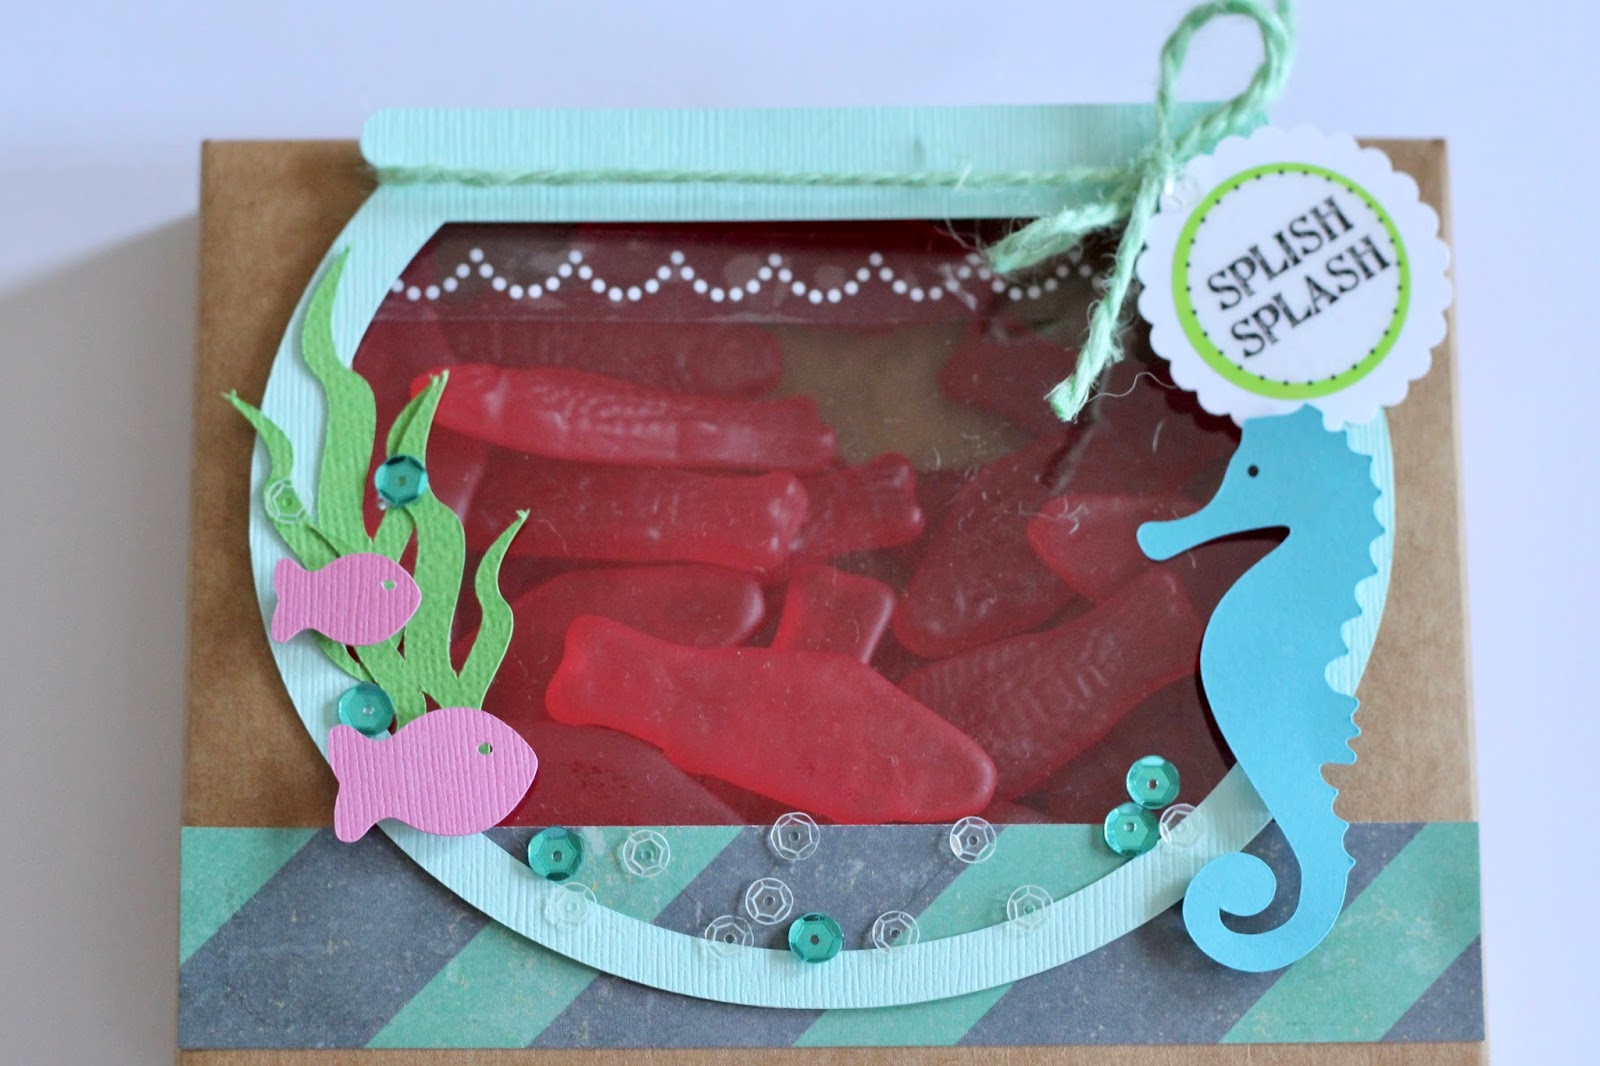
I am here to share a quick and easy birthday treat bag project. Me and my best friends all have birthdays in the summer, almost a week from one another, so we celebrate all together with a dinner out. This year I wanted to create something special for them, so I created these lithe packages using SRM bags.


Each bag contained a magnet and some sweets.  Since the magnet has some ceramic elements, I wrapped it with bubble paper embellished with labels by the dozen birthday stickers


I also added handwritten wishes with Le Pen 4 Piece Set - Dark Colors.


I used a SRM white lace doily to close the bag, folded it in a half to fit around the bag and then I decorated it with SRM products. I used a punched piece and added a sticker from the sentiment/love sheet on top. I added a small bow made with light pink jute. I often use a staple to hold embellishments down, since it adds texture and that little extra. Then I added stickers from We've Got Your Border/Birthday and Stickers By The Dozen/Birthday. As a final touch I added a sequin to make it sparkle!


For the green chevron patterned bag I used the same design, changing colors and stickers.  I layered a cute Stickers By The Dozen/Birthday Birdie on a  punched pieceadded a small bow made with light blue jute and completed the bag with We've Got Your Border/Birthday stickers and Stickers By The Dozen/Birthday. Again, I added a sparkling sequin!


I am in love with these bags!  They are perfect for gifts, treats or just because!  What would you do with them?

Until next time,
ciao, Giorgia

SRM products used 

--------------

And here's a bit more information on Georgia in her own words....

Hello!  My name is Giorgia Rossini. I am Italian.

I am a Radiation Technologist with a huge passion for crafts. I always was creative. I made jewels, I paint and I love working with felt. I started scrapbooking on 2009, but after 5 years it become my favorite! Scrapbooking is my happy place:  I really need to have time for me, to be creative, after working in the hospital. 

I am married and me and my husband love to travel the world: our travels are well represented in my scrap.   I love to preserve memories and to create cards for my friends and family,  I love to look at my LO and mini books and feel again those feelings.  

I am so happy to be part of SRM Stickers!

Ciao
SaveSave

Saturday, July 29, 2017

Bible Journaling Book Mark/Tip by Tenia


Here's a special Saturday Blogpost as we say farewell to Tenia Nelson who has been on the SRM Design Team multiple times!  I'm sure that we will be seeing here again! :)  

Tenia's talents are many.  Here lettering is awesome, her stamping and coloring skills are superb!  And her love of SRM Sticker Stitches is one for the record books!  

Thank you Tenia for all that you have done using SRM!  We love you!

-----------------

Tenia here from Jazzy Paper Designs showing y'all some goodness that I created with SRM products....CHECK IT!!!!


I had a BLAST on this Bible Journaling/Hand Lettering project!!! Here are all of the SRM products that I used on this project: Marvy Uchida Le Plume Markers, Old Testament Clear Stamps, Walk By Faith Clear Stamps, Clear Stamp/Big Numbers and Sticker Stitches/Christmas.

Thanks for stopping by and have a great day!!!!

Friday, July 28, 2017

Shine Your Light Layout by Melanie


Hello! Melanie here today I am sharing a layout with you. My daughter just graduated from high school and is off to university this fall. Her light truly shines. This senior portrait of her is one of my favorites.


 I used a couple of different SRM stickers for the layout. It was fun to add them into the journaling.


 Layering the stickers on the patterned paper is seamless with the clear backing. I love the finishing touch of the Sticker Stitches, too.


Enjoy your day, and remember to "Shine Your Light!" :)

SRM Products Used:
Sticker Stitches
Sticker Sentiments/Shine Your Light
We've Got Your Sticker/Hello
Year Of Memories/2017

Thursday, July 27, 2017

Stamped Fitness Tracker Notebook


Hello!  Karen here today to share a fun idea using SRM Planner Stamps and the new Pray Journal Repeat Stamp set. I love all the shapes on that stamp.  I'm going to use it a lot!

So, like many of you, I find myself in a position where I need to pay more attention to my health and fitness. I am trying to exercise more and I thought if I made a notebook to track my progress I would be more motivated. With the help of some SRM stamps, I'd like to introduce my simple fitness tracker traveler's sized notebook.


v

Cute, hey? I used some scrapbook paper and cards from my stash and embellished them with stamps. The new mini alpha, found on the "Pray Journal Repeat" set helped me label my notebook "health and fitness." To remind me to "just do it" I randomly stamped {DO IT} from the "Notes to Self" Planner stamp set on the cover.


On the inside front cover, I couldn't help but use the "You can do it"~coffee stamp found on the new "Coffee Plans" set and highlighted it with a green stamped circle from the "Pray Journal Repeat" set.


I've kept the inside pretty simple (because I need to make time for exercise, right?). I stamped the doodle square (from "Pray Journal Repeat") 7 times on each page and then labeled each square with the days of the week (from Planner Notes to Self).


Each day I exercise I can stamp a thumbs up (yay me!) from the Everyday Plans set and write in my exercise for the day. I may add a page for my eating habits later, but for now it's one thing at a time!

For this project I used:

Wednesday, July 26, 2017

Baptism Tip In by Samantha


Hello! Samantha here with you today. I have a Bible journaling baptism tip-in to share that uses lots of SRM stamps!  A tip-in is kind of like a bookmark.  Sometimes you may not want to journal in your Bible but you have something special that you want to have tucking into your Bible.  That's where a tip-in works well.


 First up, here's everything I used to create my tip-in:


For stamps I combined BIG Trinity, I AmBirthday Plans, and Today Tomorrow To Do. By combining a few pieces from multiple stamp sets I was able to create something completely new and different than I would have if I stuck to only one set. I colored in my stamped words with ColorIn Watercolor Pencils


There are different reasons to create a tip in, but as you can see from the picture above, I created a tip in because I had already journaled on the page containing the verse I wanted to use (You can find all the details on the I am with you always page here). Instead of deciding I just couldn't journal about the verse I wanted to do, I added an extra page to my Bible in the form of a tip in so I would have more space. 


I created my journaling with dates my sons were each baptized on a separate piece of paper (I chose a piece of faith patterned paper, but you could use card stock, journaling tags, or even vellum). Then I attached the page inside my Bible with a little bit of washi tape.  


This baptism tip in is a great way to add some important dates to my Bible in a place where I've already journaled. Have you ever created a tip in?  

Tuesday, July 25, 2017

Stickers & Die Cuts by Michele


Good morning!  So glad you could stop by for a visit!  Michele here today and I have a card that uses the negative space of a die cut.  I cut the image 6 times and continually glued the "negative" pieces in place.  Once I got to my last layer I added color with Copic markers.  


I die cut flowers and leaves and Copic colored those as well.  I added a layer of glossy accents to all of my colored pieces.  While that was drying I die cut a circle and adhered an SRM sticker from the Life if Good collection  I adhered the flowers and leaves to frame out the sentiment and glued various rhinestones and pearls to finish off the card. 


Have a wonderful day my crafty friends!

SaveSave

Monday, July 24, 2017

Fish Bowl Packaging by Shantaie


Hello!  Shantaie here today having fun! 

There's few things I love more than packaging.....anything! I'm one of those people who loves to wrap gifts, and package favors of any kind! When this weeks assignment was packaging, I really wanted to use a kraft window box to showcase some candy fish. 


By cutting a fishbowl to layer over the window, it gives the illusion of a shaker box, or a custom made favor box, how fun is that?!

I added a little piece of border sticker scallop as a little watery wave, and a sticker on a punched piece tied with mint jute twine. 


To finish the box, add a few little fish and some sea colored sequins. Fill the box with fish candies, or fish crackers for an adorable little favor or gift! 

Friday, July 21, 2017

Mixed Media Tags by Tobi


Hello!  Tobi here today.  I love to play with lots of different mediums and styles - it keeps this hobby of mine (which I have done for over 11 years now) fresh, new, and interesting. 

Today I am sharing some tags made with extra paint from a painting project. 


I have recently started experimenting with Acrylic Pouring and the paint that drips off the side of the canvas is just too gorgeous to throw away!!! 

Here's my painting: 


And here's the pool of paint that ran off the side. I simply dragged some tags through the paint and I had some lovely backgrounds ready to go! 


Some simple, yet striking die cuts paired with a versatile SRM sticker sentiment was all it took to dress these tags up. 


I love how a clear sticker adds just the right touch! 


Thursday, July 20, 2017

CAS Card Set by Melanie


Hello! Melanie here today to share a Clean-and-Simple (CAS) card set that I put together.


For this project, I challenged myself to using: 10 sheets of cardstock, 2 sheets of SRM stickers, and a variety of die-cuts and ribbon in my stash bowl.


Knowing that the majority of these cards would be used for mailing purposes, I kept them (mostly) flat. To add texture, I using embossing templates with my die cutting machine. 

I kept the designs fairly similar to keep the process streamlined. The first step was to cut the mats and layering pieces for each card. Then I ran the top layering pieces through the embossing. Next, I matched up the stickers, die-cuts, and ribbons. After adhering the pieces together for each card, I snapped this photo to show the simple and similar designs:


Then I adhered the card faces to the card bases and am so thrilled to have 20 cards ready to go! Here are a few of them close up:


My mom has a birthday this month. She loves getting handmade cards as a gift (she writes several letters and notes each month). I tucked a set of cards into one of the SRM white glassine bags, along with envelopes, stamps, and a writing pen. Then I decorated the bag a bit for fun.


Working this way was a good process for me. I could work in steps and bits of time here or there. Clean and Simple works really well for me :) Enjoy your day!

SRM Products Used:
Sticker Stitches
Sentiment/Thinking of You
Glassine Bags
Gold Doily

Wednesday, July 19, 2017

Hello by Shelly


Hey y'all! Shelly, here.
Today, I'm sharing a fun and sweet card with you!


I started with my card base, which I made longer than the standard size (to be sure my sentiment piece would fit). After, I stamped on my cacti in greens and added a flower to my little one, then some faces. 


Once done I added my sentiment sticker to a piece of kraft cardstock and added it to my card. To finish things off, I added a touch of jute twine. Simple, yeah?!...

Thanks so much for stopping by!
Enjoy your day!

SRM Stickers supplies used:

Jute Twine

Tuesday, July 18, 2017

S'mores Tubes by Shantaie


Good morning!  Shantaie here with a fun summer treat. 


S'mores are loved by all, and what could be better than a tube of s'mores to go? A shot of chocolate, marshmallow, and crispy sweet graham crackers...yummy!!!


I filled each tube with a little of each ingredient and topped it off with a tag stamped with arrows from the bible background stamp set and a paper pieced campfire, and a little banner of 


To make your own, just fill with a few graham bears, mini marshmallows, and two mini chocolate bars. Munch on them as a snack to go, or melt for a little s'mores gooey goodness!