Tuesday, June 30, 2015

Birthday Shaker by Michele


Howdy! Michele here with a birthday shaker card to share with you today!  Honestly I never seem to tire of them! They are so fun and interactive!  I used my Silhouette to cut the bow and leaves.  I added loads of glitter for a bit of sparkle. 

SRM Sticker Blog - Birthday Shaker by Michele - #card #shaker #birthday #stickers

I used various Spellbinder's dies to create the circular shaker part.  I was a bit light on my sequins though....as you can see when the card is vertical, they sort of disappeared! LOL!  I've learned you can't be skimpy! I added a sentiment from SRM Stickers from the Stickers by the Dozen collection.  It was adhered to vellum and cut into a banner shape.   
A few pearls finishes the card off. 

SRM Sticker Blog - Birthday Shaker by Michele - #card #shaker #birthday #stickers

Have a great day my friends! Thanks for popping in! :)

Monday, June 29, 2015

SRM New Design Team Introduction


A funny thing happened on the way to selecting the new 2016 Design Team. I started to see existing members and previous members of our team apply again.  These are truly die-hard lovers of all things SRM and they love the new direction that we are taking. 

So I decided… why not have a team that's a collection of team members present and past who simply love SRM.  It's like a reunion of sorts.  I can hardly wait to see what this amazing group of ladies do.  I know that you are in for some major inspiration when their term begins in just a few weeks. 

So without further ado… let's meet the 2016 SRM Design Team in no particular order!  It's like we are having a party here! :)  And I've included one of my favorite projects from each of them.

*****
A Prolific Card Maker Extraordinaire
Completely addicted to Sticker Stitches!


Love Tenia's bold, beautiful style!
Do you spy the Sticker Stitches?  They are often in the company of Washi Tape! 
Check it!


*****
She does it all!  Can't wait to see what she does with SRM's new patterned vinyl!
Welcome back Amy!


Amy loves twine and vinyl.  {{SIGH}}


*****
She LOVES her SRM.  
Containers, planners, party favors anyone?
Welcome back Angi!


This planner is dripping with SRM Stickers! How fun!


*****
Layouts, altered projects, vinyl projects, cards…
all beautifully done!
Welcome back Juliana!


Love how Juliana combined Jane's Doodles Stickers, SRM Vinyl, SRM Kraft Window Box and Twine on this adorable project! 


*****
Lesley creates such beautiful cards and altered projects plus she's an avid stamper and can't wait to get her hands on her Jane's Doodles and SRM BIG Stamps!
 Welcome back Leslay!


SRM's Fancy Stickers are Lesley's favorites and her fancy cards are some of my favorites!  {{SIGH}}


*****
Love her beautiful style on layouts, mini calendars, containers and more.
 Welcome back Tessa!


What a beautiful Mini Calendar project!  Mini Calendars are Tessa's favorite product.  Simply perfection!


*****
An artist who does it all.  Has a passion for crafting and it shows.  And an addiction for anything SRM.  We love that!
 Welcome back Shannon!


Shannon is addicted to Sticker Stitches and Clear Sticker Sentiments. I love to find them on her projects!  How many do you count?


*****
Cards, Stamping, Party Favors, Vinyl.  You name it.  She does it and beautifully! An energetic dynamo who loves her SRM! 
Welcome back Annette!


Here's a wonderful wooden heart from Annette decorated with SRM Vinyl and Jane's Doodles Little Miss Mia stamp! It was featured in the SRM Booth at CHA.


*****
A mother, a pastor's wife, a scrapping, cardmaking lover of all things DIY… Don't know how she does it all!
Welcome back Christine!


Christine has a clean, crisp design that shines in this star Mini Calendar.  Super cute!


*****
What she does with vinyl amazes.  Her cards are luscious layers of delight. And
on most of her projects, she weaves a touch of SRM into the blend.
Welcome back Shantaie!


What a fun card for camping enthusiasts with that banner of SRM Borders!  Love Shantaie's whimsical style! 


*****
A die cut specialist creating fabulous cards, layouts, vinyl projects and favors…mostly all with dies cut and SRM products of course! 
Welcome back Cathy!  By the way, love the new look!


Love how Cathy uses her Lori Whitlock and SRM on so many fabulous projects!


*****
Her cards are totally dreamy with die cuts, lots of glitter or sequins and a touch of SRM.
 Welcome back Michele!


Check out all the beautiful details of this sweet gift box using Jane's Doodles stamps and a touch of twine.  And don't forget the glitter!


*****
She's got a passion for stamping, cards, vinyl, chalkboard or anything else that has to do with crafting…especially her SRM!
Welcome back Lorena!


This set of cards stamped with Jane's Doodles and loaded into a clear A2 Container is one of my all-time favorites from Lorena.  But it's hard to choose…all her work is spectacular!


*****
Stamp designer of Jane's Doodles and a special member of our team with a focus on using Jane's Doodles and SRM together.  
Welcome back Jane.  


What a talent Jane is!  She not only designs the Jane's Doodles Stamps; she then creates the most beautiful projects.  This one using our new Tea Time stamp on a SRM Kraft Pillow Box is simply divine!


And there you have it!  13 fabulous all-star designers ready to give you lots of inspiration on all things SRM…. stickers, stamps, dies, vinyl, twine, containers, calendars, and the list goes on and on… 

Thanks for joining us today and be sure to check in on July 15th when this team will begin it's term. 
Can't wait! 


Friday, June 26, 2015

Guest Designer - Jennifer Ingle


Hello, SRM friends! I am so excited to be here as a guest today! 

SRM Stickers Blog - Guest Designer - Jennifer Ingle - #card #clearstamps #guestdesigner #janesdoodles #littlemissmia #stickers #stitches #thankyou

This is Jennifer Ingle of Just Jingle and today I have an adorable card to share with you using some SRM Stickers and Jane's Doodle Stamps. I absolutely LOVE how adorable these stamps are! SO CUTE! 

SRM Stickers Blog - Guest Designer - Jennifer Ingle - #card #clearstamps #guestdesigner #janesdoodles #littlemissmia #stickers #stitches #thankyou

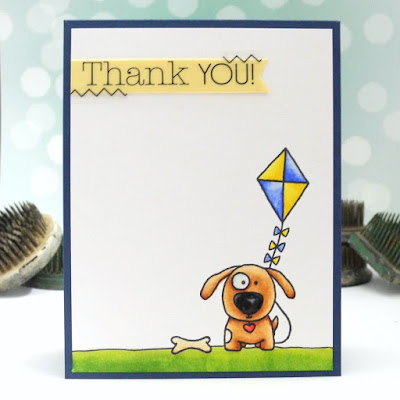
I began with the Little Miss Mia stamp set. That little girl stamp is SO cute, but if you know me, you know the puppy caught my eye first and foremost! 

SRM Stickers Blog - Guest Designer - Jennifer Ingle - #card #clearstamps #guestdesigner #janesdoodles #littlemissmia #stickers #stitches #thankyou

Puppies ALWAYS win! I colored him with Spectrum Noir pens and masked him to stamp the kite before coloring that portion, as well. A bit of glossy accents make his nose super shiny!

SRM Stickers Blog - Guest Designer - Jennifer Ingle - #card #clearstamps #guestdesigner #janesdoodles #littlemissmia #stickers #stitches #thankyou

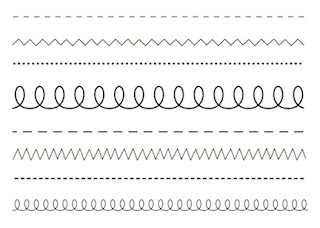
I accented the sticker sentiment from the Stickers by the Dozen Thank You set with Sticker Stitches.  I love the stitches! They make the life of this non-sewing machine friendly crafter MUCH easier!  And now SRM has just introduced a Stamped Stitches stamp.  Hmmmm….think I might need one of those!

SRM Stickers Blog - Guest Designer - Jennifer Ingle - #card #clearstamps #guestdesigner #janesdoodles #littlemissmia #stickers #stitches #thankyou

I had a great time pulling this fun little design together! These stamps?! SO CUTE! Love them! Thanks for stopping by today!

Thursday, June 25, 2015

Summer Sticker Stitches Layout by Christine


Sticker Stitches - we love 'em here at SRM Stickers!  They are a go to for so many of us!  Christine joining you today with a layout that is made of tons of Black Sticker Stitches!

SRM Stickers Blog - Summer Sticker Stitches Layout by Christine - #layoiut #srmpress #stickers #stickerstitches #stitches

This layout doesn't use any patterned paper!  That is kind of incredible in this industry!  But sticker stitches helped me create a fun and whimsical background!

SRM Stickers Blog - Summer Sticker Stitches Layout by Christine - #layoiut #srmpress #stickers #stickerstitches #stitches

To start with I created scribbles with gelatos - one color for each of my kids.  I then topped each one with a star that I made from the Sticker Stitches.

SRM Stickers Blog - Summer Sticker Stitches Layout by Christine - #layoiut #srmpress #stickers #stickerstitches #stitches


Each kiddo got a different stitch for their star- it was fun to watch how they turned out with different stitches.  If you want to make stars like this you will want 2 sheets of the Sticker Stitches - because it takes about 1 1/2 stitch to make each one. I also added in some die cut solid black stars to play up the star feature even more.

SRM Stickers Blog - Summer Sticker Stitches Layout by Christine - #layoiut #srmpress #stickers #stickerstitches #stitches

I added in various sticker stitches into my margins outside of the picture area.  I cut them to be different sizes and didn't worry if they were straight or symmetrical - I just put 'em down!  It made for a super cool and one of a kind background!

And if you don't want to mess with the stickers - guess what!?! We have Clear Stamp Stamped Stitches now too!  They will be awesome and allow you to make a project like this just as easily!

Wednesday, June 24, 2015

My Everyday Girl Layout by Tessa Wise


Hello!  Today it's me Tessa Wise with a layout to share:

SRM Stickers Blog - My Everyday Girl Layout by Tessa Wise - #layout #stickers #twine #stickerstitches #girl

These photos of my daughter Natalie were taken a few years ago but they show so much of who she is.  I love them!  She is an easy going, happy girl who is up for just about anything!  She loves to be outside and she loves all things pink! :)

SRM Stickers Blog - My Everyday Girl Layout by Tessa Wise - #layout #stickers #twine #stickerstitches #girl

I chose the Express Yourself - Everyday Girl Sticker Sheet to work with since the story I want to tell is about Natalie's everyday attitude.  I also pulled out a Sticker Stitches- Black Sticker Sheet and Solid Pink Sorbet Baker's Twine to use as accents.  The papers are from Bella Blvd and my layout inspiration came from Sketch 440 by Scrapbook Challenges.

SRM Stickers Blog - My Everyday Girl Layout by Tessa Wise - #layout #stickers #twine #stickerstitches #girl

The Express Yourself Sticker Sheets make scrapbooking so easy!  The titles and journaling accents are all in one and ready to go!  I can't wait to pull another one out and get to work on another layout!

Tuesday, June 23, 2015

Wall Glass Calendar by Cathy Andronicou


Hello!  Cathy Andronicou With you today!  Family lives are so busy these days it is often difficult to keep track of all that is going on. At our home we have added a glass panel to our wall with an acetate square calendar month behind to help record all the important events for the month.  I'll be using SRM's new Chalkboard Markers

I was so excited to discover that my chalk markers work beautifully on the glass.  The thicker markers are great for adding symbols and bold lettering and the fine ones are just perfect for recording events.  And what makes them even more perfect for the job is that the writing wipes off easily with a dry eraser or a damp cloth!


SRM Stickers Blog - Wall Glass Calendar by Cathy - #calendar #chalkboardmakers #fluorescent

On this project I used SRM's Bistro Florescent Chalk Markers both the 6mm & the Fine Tip

I have also done a little video showing how easy it is to write on and wipe off.
Enlarge to view and Enjoy!


Here's some of the products I used on today's project.  And a few others that I plan to use in the future! :)


Thanks for stopping by.  And happy crafting!

Monday, June 22, 2015

❤{Olive You}❤ by Shannon


Hello!  Shannon here today to share a special project that's all about love using SRM's Bistro Chalk Markers!

SRM Stickers Blog - ❤{Olive You}❤ by Shannon - #homedecor #sign #chalkboard #markers #fluorescent #DIY

These markers are wonderful. I really, really mean it! I love the consistency and different sizes you have to work with. You can use them for so many things.

I repurposed a sign for my kitchen. I filled in the middle of the sign with my very cool BIG Easy Chalkboard Marker before creating the design.  Since the sign was going to hang in my kitchen and I am a lover of food puns, it has a cheesy smiling food pun. Olives, to be exact!

Even more awesome, you have the availability to create texture with these markers. I blended my olives with my fingers, creating shadows and texture. You can also create a relief, using a wet Q-tip. I created the smiles by simply using a wet Q-tip to erase the green. It may take a few Q-tips to get down to black, but with a little patience, you can create a great design.

SRM Stickers Blog - ❤{Olive You}❤ by Shannon - #homedecor #sign #chalkboard #markers #fluorescent #DIY

Here's a close up of the details on this sign: 

SRM Stickers Blog - ❤{Olive You}❤ by Shannon - #homedecor #sign #chalkboard #markers #fluorescent #DIY

Materials Used: 

Bistro Chalk Marker Fluorescent 6mm Tip

Thank you for letting me share!  What would you make with these chalkboard markers?  The possibilities are endless!


Friday, June 19, 2015

Thank You by Cassonda


Hello!  Cassonda with you today with 2 special cards for 2 special people.  School is almost out and I have a couple of special teachers to thank for all their help this year. My first year teaching kindergarten and I had a lot to learn. Thank goodness I had some help. 

For my first card I added just a small amount of whipped spackle to the lower corner. Using a template made it super easy to add the dotted pattern. Once dried I splashed some pink shimmer mist onto the card. I added lots of layers and fun things to look at. The fun scribble cut in the background is from 17 Turtles. (remember?) Awesome, right? I loved how the Thank You sentiment sticker fit perfectly on my vellum journal tag. SRM stickers are clear so you really can place them anywhere. The last bit was a small piece of sticker stitches going down the side.


The second card is made using some pretty doily paper from Maggie Holmes. I  wanted to add a pink doily to my card but I didn't have any. So what's a crafty girl to do? Pull out some paints, mix a few colors, add some glitter and paint a 4" white doily PINK! I really wish you could see the sparkle. It's amazing! (It was difficult to photograph so you will just have to trust me.) The clear sentiment MERCI sticker fit right on top of my vintage tag. Lastly, I added just a bit of blossom baker's twine to the top of my grey stamped tag. {If you look closely there's a bit of white sticker stitches at the bottom.}


Thanks for letting me share. 
I hope you enjoyed my cards and have gotten some inspiration from them.